Control Panel Symbols and Usage - Compact Heat Pump Dryer
The Control Panel symbols are different than most dryers
This section gives an explanation of the buttons and indicators for your dryer. See your Owner's Manual for further explanation.
If you would like to download or view product literature for your appliance, please visit our Manuals and Literature page.
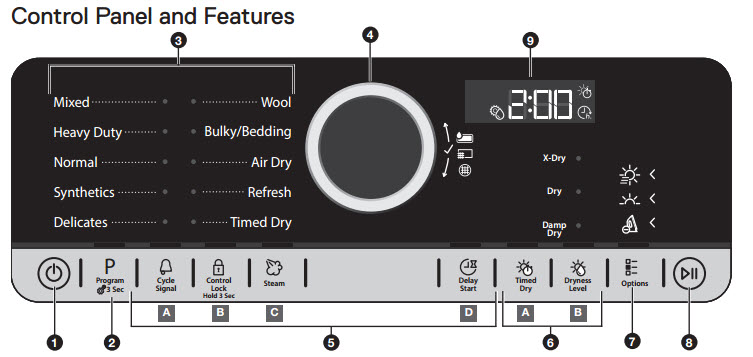
 POWER BUTTON Touch until the indicator above the Program button lights up. Symbols appear on the control panel and sounds are played.
 PROGRAM When you turn on the dryer, the light above this button will turn on. The program settings which you used last will appear on the control panel. This button also lets you set water conductivity (dryness level) (see “Adapting the dryer to water conductivity” in your Owner's Manual or "Conductivity adjustment (dryness level)" below for more information).
 PROGRAM/CYCLE AREA An indicator next to each program/cycle lights up as you use the knob to scroll through the list. Press the center of the knob when the indicator next to the desired program/cycle lights up.
 CONTROL KNOB Turn the knob to select a program/cycle for your laundry load. Then you can make changes to dryness level, set drying time or delay start time, or select Other Options. Press the center of the knob to confirm your selection.
 OPTIONS Touch to activate additional dry options or additional features on the dryer before touching the Start/Pause button. Additional dry options or additional features selected after touching the Start/Pause button may not be activated. To return to factory default cycle settings, unplug the dryer for 30 seconds, then plug back in.
NOTE: Not all options are available with all cycles.

 Cycle Signal - Use to turn on or off the signal indicating the end of a drying cycle.
NOTE: Touch and hold the Cycle Signal button for about one second to turn sounds on or off.

 Control Lock - Use to lock the controls of the dryer and avoid an accidental change in cycle options or preferences during a drying cycle. Touch and hold CONTROL LOCK to lock or unlock the controls of the dryer.
NOTE: The Control Lock function may be enabled when recovering from a power failure. To unlock the control, touch and hold CONTROL LOCK.

 Steam - Touch to activate the Steam option, which adds humidity to the end of the Heavy Duty, Normal, or Synthetics cycle to help smooth out wrinkles.

 Delay Start - Touch to start your program/cycle at a later time.
 SETTINGS
 Timed Dry - Sets the length of a Timed Dry cycle.
 Dryness Level - When using some Automatic Cycles, you may select a Dryness Level based on the type of load you are drying.
NOTE: Dryness Level is for use with Automatic Cycles only.

 Other Options
After setting drying time or dryness level, the indicator light above “Options” lights up. Turn the knob to select the desired option(s). As you turn the knob, the option symbols above the Options button will light up one at a time as you turn the knob. Stop turning when the symbol of the desired option lights up. Press the knob to confirm your selection.
* Not all options and settings are available with all programs/cycles. See “Program/Cycle Guide” in your Owner's Manual for available options and settings.
 Save Time - This option provides quicker drying.
 Gentle - This option dries laundry more gently by reducing the drying temperature.
 Wrinkle Shield™ - This option helps to avoid creasing if you cannot unload the laundry soon after the program/cycle ends. The dryer starts to tumble the laundry periodically starting a few minutes after the program/cycle ends. This tumbling will last up to approximately 12 hours. Tumbling can be stopped any time by touching the Power button to turn off the dryer.

 START/PAUSE BUTTON - Touch to start, or touch and hold to pause, a program/ cycle.
 LED DISPLAY
When you select a program/cycle, its default settings will light up and the Estimated Time Remaining will be displayed. Factors such as load size and dryness level may affect the time shown in the display.
Symbols:
 Drying time
 Delay start
 Conductivity adjustment (dryness level)
Adapting the dryer to water conductivity - The drying results are affected by the conductivity of the water used during washing. If, by modifying the available dryness levels (damp dry, dry, and extra dry), you are not satisfied with the final drying results, you can adapt the water conductivity level. The dryer comes with preset level 3. Choose between level 1 (most damp results) and 5 (most dry results). 1. Touch and hold the Program button. The display will count down until the Conductivity Adjustment symbol on the display flashes and the current setting is shown. 2. Turn the knob to adjust the level (1-2-3-4-5). Press the knob to confirm your selection. NOTE: This new setting will affect all future cycles. If the desired drying results are attained, water conductivity will not require further adjustment.
STATUS INDICATORS (next to control knob) These indicators will light up to alert you when certain conditions occur.
Symbols:
 Water tank full (see “Empty Water Tank” in the “Using Your Dryer” section of your Owner's Manual).
 Clean bottom filter (see “Cleaning the Bottom Filter” in the “Dryer Care” section of your Owner's Manual).
 Clean door filter (see “Cleaning the Lint Screen” in the “Dryer Care” section of your Owner's Manual).
Still need help? Contact us or schedule service.
Please contact us or click below to make an appointment from our preferred list of service providers for service on your appliances.
United States
Canada
Interested in purchasing an Extended Service Plan?
Please click below to learn more on how you can save up to 25% on New Appliance Extended Service Plans within 30 days of your appliance purchase.
United States
Canada